Sticker Bomb Design Tutorial: Layer & Overlap
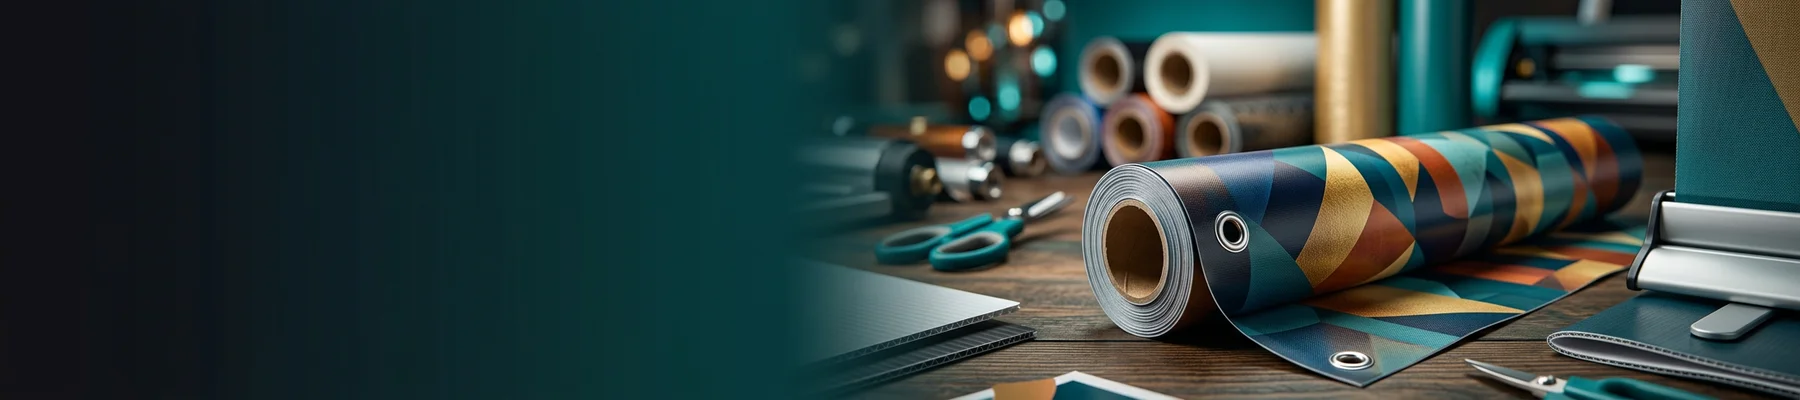
A sticker bomb design tutorial walks you through the process of layering dozens - sometimes hundreds - of stickers across a surface to create a dense, chaotic, visually striking collage. 4OVER4.COM offers stickers in custom shapes, sizes, and finishes that make sticker bombing accessible whether you're covering a laptop lid or wrapping an entire car hood. The technique blends street art energy with personal expression, and you don't need an art degree to pull it off.
Sticker bombing started in the underground graffiti and skateboarding scenes of the 1990s. Artists would slap hand-drawn stickers on street signs, lamp posts, and bathroom walls. Fast forward to today, and it's everywhere - from custom guitar cases to branded retail displays. The appeal is simple. You take a plain surface and turn it into something that demands attention. Every sticker tells a micro-story, and the full composition becomes greater than the sum of its parts.
If you've been curious about how to actually do this well - not just randomly slapping stickers on things - this sticker bomb design tutorial covers everything. Surface prep, layout strategy, sticker selection, printing options, and finishing techniques. Let's get into it.
What Sticker Bombing Actually Is (And Why It Works)
Sticker bombing is the practice of densely layering stickers across a surface until little or no background remains visible. The result is a rich, textured collage that reads as both random and intentional. Think of it as controlled chaos. You're building a visual landscape one sticker at a time.
The technique works because the human eye loves pattern density. When dozens of colors, shapes, and illustrations overlap, the effect is magnetic. People stop and look. They lean in. They start picking out individual stickers and reading the details. That's powerful whether you're decorating your personal gear or building a branded installation for a trade show booth.
Businesses use sticker bombs for guerrilla marketing, product packaging accents, and event activations. Artists use them for portfolio pieces and gallery installations. Hobbyists use them to personalize everything from water bottles to motorcycle helmets. The applications are genuinely limitless.
What separates a good sticker bomb from a messy one? Intentional variety. You want a mix of sizes, shapes, color palettes, and illustration styles. You want some overlap, some tight clusters, and a few anchor pieces that draw the eye. That's where planning matters - and where this tutorial earns its keep.
Gathering Your Supplies Before You Start
Every solid sticker bomb design tutorial begins with materials. You can't wing this part. The quality of your stickers and tools directly determines whether your finished piece looks professional or peels off in a week.
Picking the Right Stickers
Start with variety. You'll want stickers in at least three or four different size ranges - small fillers, medium feature pieces, and a few large anchor stickers. Mix illustration styles too. Cartoon characters next to typography next to abstract patterns creates that signature sticker bomb energy.
Durability matters. If your surface lives outdoors or gets handled frequently, choose vinyl stickers with UV-resistant lamination. For indoor projects like laptop lids or notebook covers, standard paper or matte-finish stickers work fine. 4OVER4.COM offers Custom Die Cut Stickers that let you print any shape you design - perfect for creating unique silhouettes that fill awkward gaps in your layout.
Need a lot of the same design? Roll sticker printing gives you consistent, high-volume output. This is especially useful if you're creating branded sticker bombs for a business activation or producing sticker packs to sell or give away at events.
Blank Templates
For inspiration on what to print, browse design templates to find starting points you can customize. Templates save hours of design time, especially if you're building a collection of 20 or 30 unique stickers for a single project.
Tools That Make the Job Cleaner
You'll need a few basic tools. A sharp craft knife or precision scissors for trimming. A cutting mat to protect your work surface. A squeegee or credit card for pressing out air bubbles. Rubbing alcohol and a microfiber cloth for surface prep. And painter's tape if you want to mask off edges or create clean borders.
For curved surfaces like helmets, guitar bodies, or car bumpers, a heat gun helps the vinyl conform to contours without wrinkling. Don't skip this step on three-dimensional objects - it's the difference between a smooth finish and visible creases.
Optional but helpful: tweezers for placing small stickers in tight spots, and a clear laminate spray for sealing the finished piece. The spray adds a uniform sheen and protects against scratching and moisture.
Planning Your Layout Like a Pro
Random doesn't mean unplanned. The best sticker bombs look spontaneous, but there's almost always a strategy behind them. Here's how to approach the layout phase of your sticker bomb design tutorial project.
Start With Anchor Pieces
Place your three to five largest stickers first. Space them across the surface so they don't cluster in one corner. These anchor pieces define the visual rhythm of your composition. Think of them as the bass line in a song - they hold everything together while the smaller stickers add melody and texture.
Fill With Medium Stickers
Next, lay down your medium-sized stickers around and between the anchors. Overlap edges intentionally. Let some stickers sit at angles. Rotate a few upside down. This layer builds density and starts creating that signature collage effect.
Pay attention to color distribution. If all your red stickers end up in one area, the composition will feel unbalanced. Step back frequently and look at the full surface from a distance. Squint. If one zone looks heavier or lighter than the rest, adjust before committing.
Pack the Gaps With Small Fillers
Small stickers are your secret weapon. They fill the tiny gaps between larger pieces and create that dense, no-background-visible look that defines a true sticker bomb. Icons, logos, text snippets, tiny illustrations - anything goes here.
This is where 3D Lenticular Stickers can add a wild visual twist. Lenticular stickers shift images as you change viewing angles, creating movement and depth in an otherwise flat composition. Even two or three lenticular pieces scattered across a sticker bomb make the whole thing feel alive.
The Dry-Lay Method
Before peeling any backing, lay all your stickers out on the surface with the adhesive still covered. Arrange, rearrange, swap pieces, and experiment. Take a photo of your layout from directly above. This reference shot saves you from second-guessing once you start actually sticking things down.
Some artists number the back of each sticker with a pencil to remember placement order. Others work in quadrants - completing one section at a time so the layout stays organized. Find whatever system keeps you from losing track.
Surface Preparation and Application Techniques
A sticker bomb is only as good as its adhesion. Skip surface prep and your stickers will peel, bubble, and curl within days. Here's how to do it right.
Cleaning the Surface
Wipe down your surface with rubbing alcohol (isopropyl, 90% or higher). This removes oils, dust, and residue that interfere with adhesive bonding. For metal or plastic surfaces, a second wipe with a clean cloth ensures nothing's left behind. Let it dry completely before applying anything.
Avoid household cleaners with moisturizers or fragrances. They leave invisible films that weaken sticker adhesion. Stick with alcohol or a dedicated surface prep solution.
Applying Stickers Without Bubbles
Peel the backing halfway. Align the exposed adhesive edge with your target position. Press it down firmly from the center outward, then slowly peel the rest of the backing while smoothing with your squeegee or card. This center-out technique pushes air toward the edges instead of trapping it underneath.
For large stickers, use the hinge method. Tape one edge of the sticker to the surface with painter's tape. Peel the backing from the opposite side, then lower the sticker gradually while squeegeeing from the taped edge outward. This gives you precise placement on the first try.
Got a bubble anyway? Don't panic. Poke it with a pin at the edge (not the center), then press the air out through the hole. The pinhole will be invisible once the sticker settles.
Working on Curved Surfaces
Curved surfaces require patience. Apply the sticker to the flattest part of the curve first, then use a heat gun on low setting to warm the vinyl. Warm vinyl stretches and conforms. Work in small sections, pressing and heating alternately. Don't rush this - overheating can warp the print or weaken the adhesive.
For extreme curves like helmet ridges or car fender flares, cut relief slits in the sticker edges. These small cuts let the material fold over compound curves without bunching. The overlapping stickers in a sticker bomb hide these slits completely.
Color Theory and Composition for Sticker Bombs
You don't need to be a color theory expert, but understanding a few basics will take your sticker bomb from "covered in stickers" to "that looks incredible." Here's what matters.
Contrast Creates Visual Pop
Place light stickers next to dark ones. Put warm colors (reds, oranges, yellows) beside cool colors (blues, greens, purples). High contrast between adjacent stickers makes each piece stand out individually while contributing to the overall energy of the composition.
If you're designing your own stickers for a sticker bomb project, add bold outlines or borders to each design. A thick white or black border around every sticker creates visual separation even when pieces overlap heavily. This is the single most effective trick for making a sticker bomb look polished instead of muddy.
Theme vs. Chaos
Decide early whether you want a themed sticker bomb or a fully eclectic one. Themed bombs use a limited color palette or subject matter - all black and white, all food illustrations, all vintage typography. Eclectic bombs throw everything together with no restrictions.
Both approaches work. Themed bombs tend to look more "designed" and work well for branding or cohesive decor. Eclectic bombs feel more energetic and personal. For business applications, a themed approach with branded stickers mixed alongside complementary graphics delivers brand visibility without feeling like an advertisement.
Looking for creative direction beyond sticker bombing? Check out Logo Sticker Design Ideas for ways to integrate your brand identity into sticker-based projects.
Designing Custom Stickers for Your Bomb
Buying premade sticker packs is one option. But designing your own stickers gives you complete control over the final look. Here's how to approach the design phase.
Software and File Setup
Adobe Illustrator is the industry standard for sticker design because it produces vector files that scale to any size without losing quality. Affinity Designer and the free tool Inkscape are solid alternatives. For raster-based designs (photos, painted textures), Photoshop or Procreate work well - just design at 300 DPI minimum.
Set up each sticker as its own artboard. Include a bleed area of at least 0.125 inches beyond your trim line. This bleed ensures no white edges appear after cutting. For die-cut shapes, create a separate cut path layer that follows your sticker's outline.
Design Principles That Work
Keep individual sticker designs simple. Bold shapes, limited text, high contrast. Remember that each sticker will be surrounded by dozens of others competing for attention. Overly detailed designs get lost in the noise. A strong silhouette with two or three colors reads better at small sizes than a complex illustration with fine details.
Typography stickers are powerful accent pieces. A single word or short phrase in a bold typeface breaks up the visual pattern and gives the viewer's eye a resting point. Mix serif and sans-serif. Throw in some hand-lettered pieces for texture.
If you're building a design portfolio, sticker bomb projects make excellent showcase pieces. See Graphic Design Portfolio Examples for inspiration on presenting creative work professionally.
Printing Your Custom Designs
Once your designs are finalized, it's time to print. 4OVER4.COM handles custom sticker printing with precise color matching and durable materials. Upload your files, choose your substrate (vinyl for outdoor use, paper for indoor), select your finish (gloss, matte, or soft-touch), and pick your cut style (die-cut, kiss-cut, or sheet).
For sticker bomb projects, die-cut stickers work best because each piece has a unique contour that fits naturally into the collage. No rectangular borders competing with your design shapes. The custom contour also makes overlapping look more organic and less grid-like.
Sticker Bombing for Business and Branding
Sticker bombs aren't just for personal expression. Smart businesses use them as attention-grabbing marketing tools. A branded sticker bomb on a store counter, product packaging, or event backdrop turns heads in ways that a standard poster never could.
The key is mixing branded stickers with non-branded complementary designs. A coffee shop might sticker bomb a display case with a mix of their logo stickers, coffee bean illustrations, vintage cafe typography, and abstract patterns in their brand colors. The result feels artistic rather than promotional - and that's exactly why people engage with it.
"We sticker bombed our food truck exterior with custom die-cut stickers from 4OVER4.COM. People photograph the truck constantly and share it on social media. It's become our most effective marketing tool - way more impactful than any banner we've ever hung."
- Priya K., ★★★★★
For more creative marketing approaches, explore Diy Greeting Card Design Ideas and Classy Business Card Design Inspiration to see how print design translates across different formats.
Sealing and Protecting Your Finished Sticker Bomb
You've spent hours planning, placing, and pressing. Don't let your work degrade. Proper sealing extends the life of a sticker bomb from months to years.
Clear Coat Options
For flat surfaces, a spray-on clear coat (polyurethane or acrylic) provides a uniform protective layer. Apply two to three thin coats, letting each dry fully before adding the next. Thin coats prevent drips and maintain the texture of individual sticker edges.
For items that flex or get handled frequently (phone cases, skateboards), a flexible clear coat or vinyl wrap overlay works better than rigid polyurethane. Rigid coatings can crack on flexible substrates, exposing the stickers underneath to moisture and abrasion.
Lamination for High-Traffic Pieces
If you're creating a sticker bomb for a commercial display or a surface that gets touched constantly, consider applying a clear laminate sheet over the entire composition. This creates a smooth, wipeable surface that protects against fingerprints, scratches, and UV fading.
4OVER4.COM offers lamination options on printed stickers themselves, which adds durability before you even apply them. Combining pre-laminated stickers with a post-application clear coat gives you maximum longevity.
Common Mistakes and How to Avoid Them
Even experienced sticker bombers make these errors. Here's what to watch for.
Not enough stickers. The number one beginner mistake is underestimating quantity. A laptop lid alone can take 40 to 60 stickers depending on size. A skateboard deck needs 30 to 50. A car hood? Hundreds. Order more than you think you'll need. Leftover stickers are never wasted.
Ignoring edge treatment. Stickers that hang over edges peel first. Trim all stickers flush with the surface edge using a sharp craft knife. For wrapped edges, fold the sticker around the corner and secure with extra adhesive or clear tape on the underside.
Uniform sizing. Using stickers that are all the same size creates a grid-like pattern that kills the organic feel. Vary your sizes dramatically. Tiny 1-inch fillers next to 4-inch feature pieces creates depth and visual interest.
Skipping the seal. Unsealed sticker bombs on outdoor surfaces degrade fast. Sun, rain, and handling lift edges and fade colors. Always seal outdoor projects.
For more creative printing ideas and tutorials, browse the full library of Printing Articles on the 4OVER4.COM blog.
Real Sticker Bomb Projects Worth Studying
The best way to improve your sticker bomb design skills is to study what others have done. Here are a few project types that consistently produce impressive results.
Skateboard decks are the classic canvas. The flat surface with gentle concave makes application straightforward, and the compact size lets you complete a project in a single session. Guitar cases and instrument cases offer larger canvases with flat panels perfect for dense layering. Retail store counters and point-of-sale displays use branded sticker bombs to create Instagram-worthy moments that drive social sharing.
Vehicle wraps represent the most ambitious sticker bomb projects. Full-panel sticker bombs on car hoods, fenders, or entire vehicles require hundreds of stickers and careful planning. But the result is a rolling art installation that gets photographed everywhere it goes.
And don't overlook smaller projects. A sticker-bombed journal cover, phone case, or toolbox lid makes a satisfying afternoon project that builds your skills for bigger canvases later. Even Free Business Cards from 4OVER4.COM can spark creative ideas for mixing print formats into your sticker collections.
"I ordered 200 custom die-cut stickers in 15 different designs from 4OVER4.COM for a sticker bomb on my studio wall. The print quality was sharp, colors were vivid, and the vinyl has held up perfectly for over six months."
- Tanya R., ★★★★★
What to Remember From This Sticker Bomb Design Tutorial
- Variety is non-negotiable. Mix at least three size ranges and multiple illustration styles to achieve the dense, organic look that defines a great sticker bomb.
- Surface prep determines longevity. Clean with 90%+ isopropyl alcohol and let dry completely before applying any stickers. Skipping this step leads to peeling within days.
- Plan before you peel. Dry-lay your entire composition first, photograph it, then commit. Repositioning stickers after application damages both the sticker and the surface.
- Seal every outdoor project. Two to three thin coats of clear polyurethane or a vinyl laminate overlay protects against UV, moisture, and abrasion.
- Custom stickers raise the result. 4OVER4.COM prints die-cut, roll, and lenticular stickers with precise color matching - giving you unique pieces no premade pack can offer.
- Design bold and simple. Individual stickers should have strong silhouettes, limited color palettes, and thick outlines so they read clearly within the dense collage. Check out Funny Print Ad Examples for inspiration on bold, attention-grabbing print design.
Your Sticker Bomb Design Questions, Answered
What are the best practices for a sticker bomb design tutorial?
Start with anchor stickers spaced evenly across the surface, then fill with medium pieces and small gap-fillers. Always clean the surface with isopropyl alcohol first. Use a squeegee to eliminate air bubbles during application. Seal outdoor projects with clear coat. For custom shapes, Adhesive Wall Fabric offers another creative surface option for indoor sticker installations.
How do I choose the right sticker bomb design tutorial approach?
Match your approach to your surface and purpose. Themed sticker bombs with a limited color palette work best for branding and professional displays. Eclectic, anything-goes compositions suit personal projects like laptops and skateboards. Beginners should start with flat, small surfaces before tackling curved or large-scale projects.
What makes a sticker bomb design tutorial effective for marketing?
Sticker bombs grab attention because they're visually dense and invite close inspection. For marketing, mix branded stickers with complementary non-branded designs so the composition feels artistic rather than promotional. Surfaces like Aluminum Floor Graphics and retail counters become interactive brand experiences that people photograph and share on social media.
How much should I budget for a sticker bomb design tutorial project?
Budget depends on surface size and sticker quality. A laptop lid project using 40 to 60 custom die-cut vinyl stickers from 4OVER4.COM typically costs between $30 and $80. Larger projects like vehicle panels or retail displays requiring hundreds of stickers can range from $150 to $500 or more. Ordering in bulk through roll printing reduces per-sticker cost a lot.