What You Need to Know Before Making Lenticular Prints
Lenticular printing turns flat images into eye-catching pieces that show depth, motion, or transformation depending on your viewing angle. The process breaks down into three stages: preparing your source images, interlacing them with specialized software, and bonding the result to a lenticular lens sheet. 4OVER4 has printed 10 billion+ cards across 1,000+ products, including 3D Lenticular Business Cards and bookmarks that stop people mid-conversation.
Your Starting Point for Lenticular Print Creation
Learning how to make lenticular prints opens up a whole different category of printed material. Instead of a static image, you get something that flips, morphs, or appears to float in three dimensions. It's the kind of print people actually pick up, tilt, and show to someone else.
"3D Lenticular Bookmarks /5"
| Quantity | Price Per Unit |
|---|---|
| 500 | $1.97 |
| 1,000 | $1.10 |
| 3,000 | $0.66 |
| 10,000 | $0.41 |
Ink Color
Effect
Number of Flips
Effect Direction
Hole Drilling
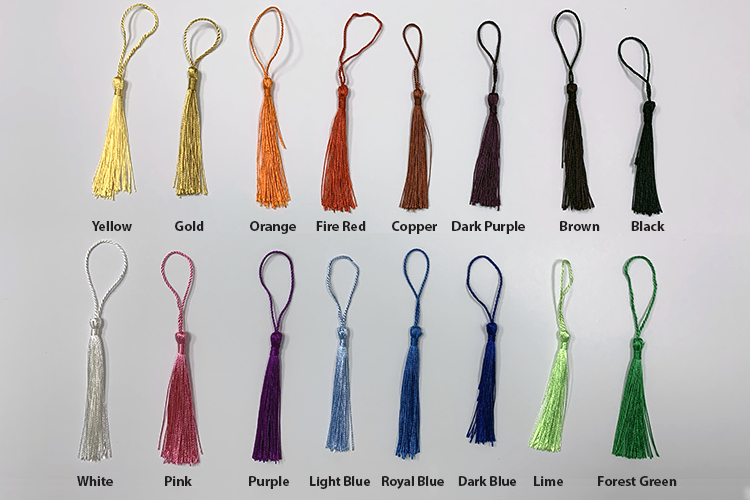
Tassels
Rounded Corners
Proof Options
The core concept has been around since the late 1800s, but today's digital tools make the process accessible to designers, marketers, and hobbyists alike. You'll need source images, interlacing software, and a lenticular lens sheet. That's the short version. The rest of this guide covers every detail.
"3D Lenticular Business Cards /5"
Ink Color
Effect
Number of Flips
Effect Direction
Rounded Corners
Proof Options
If you're exploring other hands-on print projects, check out guides on making Custom Magnets Faq or try 4OVER4's Online Designer for layout work. You can even pair lenticular pieces with a QR Code Generator link to drive people from a physical print to a digital experience.
"3D Lenticular Greeting Cards /5"
Ink Color
Effect
Number of Flips
Effect Direction
Scoring
Folding
Matching Blank Envelopes
Proof Options
Below you'll find 4OVER4's lenticular product options to get a feel for what's possible before you start designing.
Step-by-Step Process for Creating Lenticular Prints
Making a lenticular print isn't guesswork. It's a structured workflow with three clear phases: creative design, technical interlacing, and printing with lens alignment. Each phase has specific requirements. Skip one, and the final print won't work. Let's break it all down.
Phase 1 - Choose Your Lenticular Effect
Before you open any software, decide what you want the viewer to experience. Lenticular printing supports several distinct effects, and your choice determines everything that follows - how many source images you need, what lens pitch to use, and how the final piece gets assembled.
Flip effect: The simplest option. Two or three images alternate as the viewer tilts the print. Think of a business card that switches between your logo and your headshot. Clean, dramatic, and easy to execute for beginners.

Free Design Templates:
Animation effect: Multiple frames play in sequence, creating the illusion of movement. You'll need 10-30 source frames depending on smoothness. It's like a GIF you can hold in your hand.
3D effect: A single scene appears to have real depth. Objects in the foreground pop forward while the background recedes. This requires layered artwork where each element sits on its own plane. It's the most visually impressive effect and the one most people associate with lenticular printing.
Morph effect: One image gradually transforms into another. A face aging, a product changing color, a before-and-after reveal. You typically need two high-quality source images with similar compositions.
Zoom effect: A subject appears to grow larger or move closer to the viewer. It's a subset of animation but focused on scale change. Great for product packaging where you want an item to "jump out."
If you're new to this, start with a flip effect. Two images, straightforward interlacing, and you'll understand the fundamentals before tackling more complex projects. For inspiration on other print formats, the Faq Hub covers everything from How To Make Flyers to How To Fold A Brochure.
Phase 2 - Prepare Your Source Images
Your source images are the raw material. Their quality determines whether the final lenticular print looks sharp or muddy. Here's what matters.
Resolution: Work at a minimum of 300 DPI at the final print size. For larger prints (posters, signage), you can drop to 150 DPI, but for business cards and bookmarks, 300 DPI is non-negotiable. Soft or pixelated source files produce blurry lenticular results.
Free Design Templates:
Color mode: Design in CMYK from the start. Lenticular prints are physical products, and RGB-to-CMYK conversion at the end can shift your colors in unexpected ways. Set your color profile before you begin.
Consistency across frames: For animation and morph effects, keep your lighting, perspective, and canvas size identical across all source images. Inconsistencies between frames create visual "jumps" that break the illusion. Lock your camera position if you're photographing real objects.
For 3D effects - layer separation: Build your scene in Photoshop or Illustrator with each depth element on its own layer. Foreground, midground, background - at minimum. The interlacing software needs these separate layers to calculate the parallax shift that creates the 3D illusion. Fill in any gaps behind foreground objects so there's no blank space when the perspective shifts.
A common approach for 3D: start with a single photograph, then cut out the subject and place it on a separate layer. Paint or clone-stamp the background to fill the hole left behind. It's tedious work, but it's what separates a flat-looking "3D" print from one that genuinely impresses.
Blank Templates


Phase 3 - Interlacing Your Images
This is the technical core of how to make lenticular prints. Interlacing takes your prepared source images and slices them into extremely thin vertical strips, then weaves those strips together into a single composite image.
Why interlacing works: A lenticular lens sheet has tiny cylindrical lenses (called lenticules) running vertically across its surface. Each lenticule acts like a tiny window that shows a different strip of the image depending on the viewing angle. When your eye moves left to right, each lenticule reveals a different strip - and your brain interprets the sequence as motion, depth, or a flip between images.
Software options: Several dedicated programs handle interlacing. Popular choices include SuperFlip, Interlace Master, and 3DMasterKit. Some are free, some are paid. They all do the same fundamental job - you feed in your source images, specify the lens pitch (LPI), and the software generates the interlaced output file.
Lens pitch (LPI) matters a lot: LPI stands for lenticules per inch. Common values range from 15 LPI (large format, viewed from a distance) to 100+ LPI (small prints, close viewing). The pitch of your lens sheet must match the pitch setting in your interlacing software exactly. A mismatch means the image won't align with the lenses, and you'll see ghosting or blurring instead of a clean effect.
Calibration test prints: Before committing to a full run, always print a calibration sheet. This is a test pattern that helps you fine-tune the exact pitch value for your specific printer-and-lens combination. Even lenses labeled "60 LPI" might actually measure at 59.8 or 60.3 due to manufacturing tolerances. That fraction of a difference matters. Print the calibration pattern, place it under your lens sheet, and find the strip that looks sharpest. That's your true pitch value.
Once calibrated, export your interlaced file at the highest resolution your printer supports. This file will look like a mess of thin colored stripes on screen. That's normal. It only makes sense when viewed through the lens.
Phase 4 - Printing the Interlaced Image
You're printing the interlaced file onto a flat substrate - typically high-quality photo paper or a synthetic material. The print needs to be razor-sharp because any softness gets amplified by the lens.
Printer requirements: Inkjet printers with a minimum of 720 DPI output work for prototyping. For production runs, offset or UV printing delivers tighter registration and sharper detail. If you're ordering through 4OVER4, the production team handles this calibration for you on products like 3D Lenticular Business Cards.
Paper choice: Use a smooth, non-textured stock. Any paper grain interferes with the fine stripe pattern. Glossy or semi-gloss photo paper works best for DIY projects. Matte stocks absorb ink differently and can soften the interlaced lines.
If you're curious about paper and finishing for other print types, guides like How To Make Envelopes and How To Clean Rubber Stamps cover material considerations for different projects.
Phase 5 - Laminating to the Lens Sheet
This is where everything comes together - and where most DIY projects either succeed or fail. You're bonding your printed interlaced image to the flat (back) side of the lenticular lens sheet.
Alignment is everything. The vertical strips on your print must line up perfectly with the lenticules on the lens. Even a half-millimeter shift ruins the effect. Work slowly. Use registration marks printed at the edges of your image to guide placement.
Adhesive options: Optically clear adhesive (OCA) film gives the cleanest results. It's a thin, transparent sheet that bonds the print to the lens without introducing air bubbles or haze. Some people use spray adhesive or double-sided tape for quick prototypes, but these methods risk bubbles and uneven bonding.
The lamination process: Peel the backing from your OCA film. Carefully position the printed image face-down onto the adhesive. Then align the assembly with the lens sheet and press from the center outward using a rubber roller or squeegee. Go slow. Apply even pressure. Trapped air bubbles show up as dead spots in the final print.
Trimming: Once bonded, trim the edges with a sharp blade and straight edge. The lens material is thicker than regular paper, so use a fresh blade and score multiple times rather than forcing a single cut.
Want to see what professional lenticular output looks like before you start? Order Free Samples from 4OVER4 to hold real lenticular prints in your hands and study the lens alignment up close.
Here are some real examples of lenticular work, plus templates to help you get started with your own designs.
Pitfalls That Ruin Lenticular Prints (and How to Avoid Them)
Skipping the calibration test print. This is the number-one mistake. Your software's LPI setting must match the actual lens pitch exactly. A test print takes 10 minutes. Reprinting an entire batch takes hours and money.
Using low-resolution source images. Anything below 300 DPI at final size produces soft, unconvincing results. Lenticular lenses magnify imperfections. Start with the sharpest files you can get.
Inconsistent source frames. If your animation frames have different lighting, color balance, or slight position shifts, the final print flickers and looks amateurish. Lock everything down before you shoot or render.
Rushing the lamination. Air bubbles, misalignment, wrinkled adhesive - all caused by impatience. Use a roller, work from center to edge, and take your time. 4OVER4 handles lamination with precision equipment on all lenticular products, which is why their output is consistently clean.
Choosing the wrong effect for the viewing distance. A 3D effect on a billboard viewed from 50 feet needs a very different LPI than a business card held at arm's length. Match your lens pitch to how people will actually interact with the print.
Common Questions About Making Lenticular Prints
What software do I need to make lenticular prints?
You'll need interlacing software like SuperFlip, Interlace Master, or 3DMasterKit. These programs slice your source images into strips and weave them into a single interlaced file. Most also include calibration tools. For image preparation, Adobe Photoshop or a similar editor handles layering and resolution adjustments. You can also pair your lenticular designs with a QR Code Generator to add interactive digital elements.
How many images do I need for a lenticular flip effect?
A basic flip effect uses two or three source images. Two images give you a clean back-and-forth transition. Three images create a sequence but require a higher LPI lens for clarity. Keep compositions similar across frames for the smoothest result.
What's the difference between LPI and DPI in lenticular printing?
LPI (lenticules per inch) refers to the lens sheet - how many tiny cylindrical lenses fit per inch. DPI (dots per inch) refers to your printer's output resolution. Both matter. Your interlacing software's LPI setting must match your physical lens exactly. Your print DPI should be at least 720 for sharp stripe definition.
Can I make lenticular prints with a regular inkjet printer?
Yes, for prototypes and small runs. You'll need a printer capable of at least 720 DPI output, smooth glossy photo paper, and a lenticular lens sheet purchased separately. For production-quality results or larger quantities, professional printing through 4OVER4 delivers tighter registration and more consistent output.
How do I prevent air bubbles when laminating to the lens sheet?
Use optically clear adhesive (OCA) film instead of spray adhesive. Start bonding from the center and work outward with a rubber roller or squeegee. Apply firm, even pressure. Work in a dust-free environment. Going slow is the single best thing you can do to avoid trapped air.
What lens pitch should I use for lenticular business cards?
For business cards and other small prints viewed at arm's length (roughly 12-18 inches), use a lens pitch between 60 and 75 LPI. Higher LPI values produce finer detail at close range. Always run a calibration test print to find the exact pitch for your specific lens-and-printer combination.