Quick Tips for Hanging Posters Without the Headache
Knowing how to put a poster on a wall comes down to three things: your wall type, the poster's weight, and how long you want it displayed. Temporary adhesives work for rentals. Command strips handle medium-weight prints. Frames and mounting hardware suit permanent installations. 4OVER4 has printed 10 billion+ cards and prints for 150,000+ businesses, so we know a thing or two about making printed materials look their best once they're on display.
Your Poster Deserves Better Than Crooked Tape
You spent time designing it. You picked the right paper stock. Maybe you even used the Online Designer to get every detail just right. Then you slap it on the wall with a piece of scotch tape and watch it curl at the corners by Tuesday. That's not a display - that's a slow-motion disaster.
"Posters /5"
| Quantity | Price Per Unit |
|---|---|
| 50 | $2.17 |
| 800 | $0.46 |
| 7,000 | $0.14 |
| 25,000 | $0.10 |
Ink Color
Finish
Folding
Scoring
Perforation
Proof Options
This guide walks you through every reliable method for how to put a poster on a wall, from damage-free options for renters to permanent solutions for offices and retail spaces. We'll cover adhesive strips, poster putty, frames, mounting rails, and more. You'll also learn which approach matches your wall type and poster weight.
" White Foam Core3/16"
4OVER4 backs every print with a Price Match guarantee, so your investment in quality printing deserves an equally quality display. And if you're into keeping your workspace tidy in other ways, check out our guide on How To Clean Rubber Stamps while you're at it.
"3D Lenticular Posters /5"
Ink Color
Effect
Number of Flips
Effect Direction
Rounded Corners
Proof Options
Step-by-Step Methods to Hang Any Poster on Any Wall
Assess Your Wall Before You Start
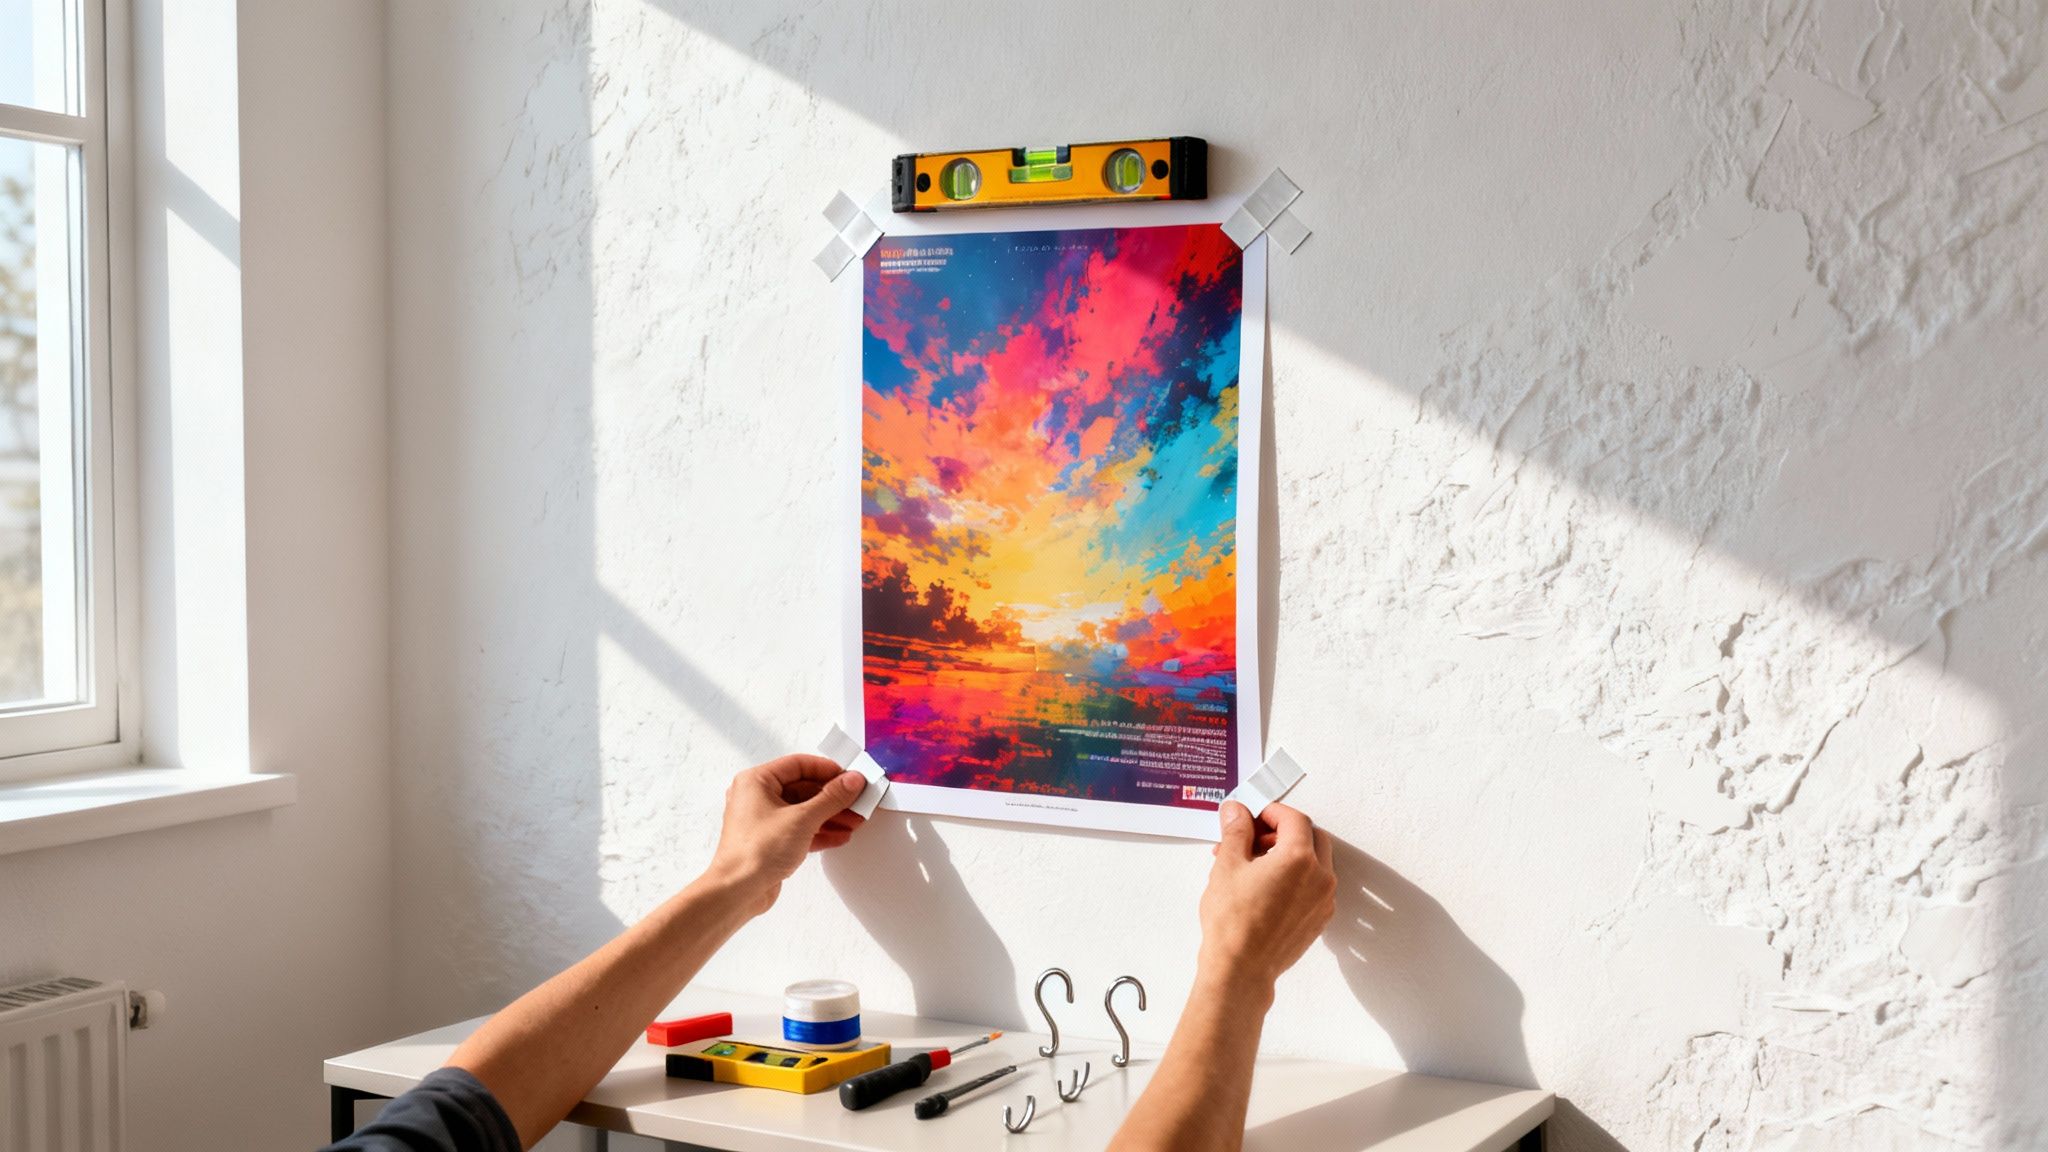
Every wall has a personality. Painted drywall is forgiving - most adhesives and hardware work fine. Brick and concrete? They're stubborn. You'll need specialized clips or adhesive hooks rated for rough surfaces. Glass and tile call for suction cups or smooth-surface adhesive strips. Textured plaster sits somewhere in between, often rejecting standard tape but accepting poster putty.
Run your hand across the surface. If it feels bumpy or uneven, flat adhesive strips won't make full contact and your poster will eventually fall. Smooth walls give you the most options. For a deeper look at other print projects that require careful handling, our Faq Hub covers dozens of topics.
Method 1: Adhesive Poster Putty (Damage-Free, Temporary)
Best for: Lightweight paper posters on smooth painted walls. Rentals, dorm rooms, and seasonal displays.
Poster putty (sometimes called mounting putty or sticky tack) is the go-to for anyone who can't leave marks. Tear off a small piece - about the size of a pea. Roll it between your fingers until it's warm and pliable. Press a piece onto each corner of your poster's back, about half an inch from the edge.
Then press the poster firmly against the wall, starting from the top corners and smoothing downward. Hold each corner for about 10 seconds. The warmth from your fingers helps the putty bond. For larger posters (anything over 18x24 inches), add putty to the midpoints of each edge too. That prevents the center from bowing outward.
Pro tip: Don't use too much putty. A thick glob actually holds worse than a thin, well-pressed piece because it can't distribute weight evenly.
Blank Templates


Method 2: Removable Adhesive Strips (Medium Weight, Semi-Permanent)
Best for: Mounted Posters, laminated prints, and anything heavier than standard paper. Office displays, retail signage, and home decor.
Command strips and similar removable adhesive strips are the sweet spot between temporary and permanent. They hold more weight than putty - most strips handle 1 to 5 pounds per pair - and they peel off cleanly when you're done.
Clean the wall first with rubbing alcohol. Seriously, don't skip this. Dust and oils are the reason adhesive strips fail. Press one side of the strip to the poster's back, the other to the wall. Press firmly for 30 seconds. Then wait. The packaging says one hour before hanging weight on it, but giving it overnight produces much better results.
For heavier prints, use pairs of strips at each corner plus one pair at the top center. If you're hanging a 4OVER4 Mounted Poster with foam core backing, you'll want at least 6 strip pairs for a 24x36 inch piece. That foam core adds weight, but it also gives the strips a perfectly flat bonding surface.
Mounted Posters
High-Quality Mounted Posters Ready to Print
Free Design Templates:
Method 3: Poster Rails and Magnetic Hangers (Clean, Modern Look)
Best for: Art prints, photography, and any poster you want to swap out regularly. Galleries, studios, and living rooms.
Magnetic poster rails clamp the top and bottom edges of your poster between two strips of wood or metal. You hang the top rail from a single nail or hook. The bottom rail adds just enough weight to keep the poster flat and wrinkle-free.
This method works beautifully for prints you want to rotate. Swap posters in seconds without removing hardware from the wall. It's also one of the cleanest-looking options - no visible tape, no frame bulk, just the poster and two slim rails. If you enjoy hands-on print projects, you might also like learning How To Make Flyers for your next campaign.
Method 4: Picture Frames (Permanent, Professional)
Best for: High-value prints, office decor, retail displays, and any poster you want to protect long-term.
Framing is the gold standard. A frame protects your poster from UV damage, moisture, dust, and accidental tears. It also makes any print look more polished - even a simple black frame turns a casual poster into a deliberate design choice.
Match your frame size to your poster size exactly. Standard poster sizes (11x17, 18x24, 24x36) have readily available frames. Custom sizes need custom frames, which cost more but eliminate that awkward gap between poster and frame edge.
For wall mounting, use D-ring hangers screwed into the frame's back, connected by picture wire. Find a stud with a stud finder, or use a wall anchor rated for your frame's total weight. A 24x36 framed poster typically weighs 5 to 10 pounds depending on the frame material and glass type.
Measure twice. Mark your nail point with a pencil. Hang the frame and check with a small level. Nothing ruins a professional display faster than a frame that tilts two degrees to the left. For other print finishing techniques, check out How To Fold A Brochure - precision matters in every format.
Method 5: Washi Tape and Decorative Tape (Creative, Casual)
Best for: Casual displays, mood boards, event decorations, and spaces where you want visible tape as a design element.
Washi tape isn't trying to hide. It's part of the look. Use it to create an X pattern across the poster, frame the edges with contrasting colors, or pin just the corners with small diagonal strips. It peels off most surfaces without damage, though you should test a small spot first on delicate paint.
This method won't hold heavy or large prints. Stick with standard paper posters under 18x24 inches. And accept that the tape is visible - that's the point. It adds personality. If you're creating a whole wall of prints and promotional materials, you might also want to explore How To Make Envelopes for coordinated mailers.
Method 6: Nails and Push Pins (Simple, Permanent)
Best for: Workshops, garages, studios, and any space where small holes don't matter.
Sometimes the simplest answer is the right one. A single nail at the top center, or push pins at all four corners, will hold a poster reliably for years. The trade-off is obvious: holes in your wall and holes in your poster.
If you're going this route, use thin finishing nails rather than thick ones. They leave smaller holes that are easier to fill later. Push the nail in at a slight upward angle - about 15 degrees - so gravity pulls the poster against the nail head rather than sliding it off.
Special Considerations for 3D and Mounted Posters
Not all posters are flat paper. 3D Lenticular Posters from 4OVER4 have a rigid plastic surface that's heavier than standard prints. These need proper wall anchors or adhesive strips rated for their weight. Don't rely on putty alone.
Free Design Templates:
Mounted Posters with foam core or gator board backing are also heavier and more rigid. The good news: their flat, stiff surface bonds perfectly with adhesive strips. The bad news: they're too heavy for tape or putty. Use at least 4 pairs of heavy-duty removable strips, or go with traditional picture-hanging hardware.
For unique promotional materials like Custom Magnets Faq, you can skip wall-hanging entirely - magnets stick right to metal surfaces like filing cabinets and refrigerators.
How to Position Your Poster for Maximum Impact
Placement matters as much as the hanging method. The center of your poster should sit at eye level - roughly 57 to 60 inches from the floor. This is the gallery standard, and it works in homes and offices too.
For groups of posters, maintain consistent spacing. Two to three inches between frames looks intentional. Random gaps look accidental. Lay your arrangement on the floor first, take a photo, and use that as your guide when you start hanging.
Good lighting makes a huge difference. A simple picture light above a framed poster, or even a well-placed desk lamp, draws attention and makes colors pop. Your 4OVER4 prints are designed with vivid, press-ready color - give them the light they deserve.
Poster Hanging Mistakes That Ruin Your Walls (and Your Print)
Skipping surface prep. Dusty or oily walls cause adhesive failure within days. Wipe down the area with rubbing alcohol before applying anything. Ten seconds of cleaning saves you from picking your poster up off the floor.
Using regular scotch tape. It yellows, dries out, and rips paint off when removed. It also tears poster corners. There's never a good reason to use it when poster putty and removable strips exist.
Overloading adhesive strips. Every strip has a weight rating. Ignoring it doesn't make your poster lighter. Check the packaging and use enough strips for your poster's actual weight.
Hanging in direct sunlight. UV light fades ink over time, even on high-quality 4OVER4 prints. If your wall gets direct sun, consider UV-protective glass in a frame or move the poster to a shaded spot.
Eyeballing the level. "Close enough" is never close enough. Use a level app on your phone - it's free and takes five seconds. A crooked poster is the first thing every visitor notices.
Posters Worth Putting on Your Wall
Now that you know how to put a poster on a wall the right way, you need a poster worth hanging. 4OVER4 offers standard Posters, Mounted Posters with rigid backing, and eye-catching 3D Lenticular Posters - all printed on professional-grade stock with sharp, saturated color.
Looking for sustainable options? 4OVER4's Green Printing program uses eco-conscious materials without sacrificing print quality. Here's a look at the available options, specs, and pricing to help you choose the right poster for your space.
Free Design Templates


| Hanging Method | Best For | Permanence | Wall Compatibility |
|---|---|---|---|
| Removable Putty | Lightweight paper posters, temporary displays in dorms or kids' rooms. | Temporary | Painted drywall, wood, glass, metal. Avoid on wallpaper. |
| Adhesive Strips | Heavier paper or small laminated posters, semi-permanent displays. | Semi-Permanent | Most smooth, finished surfaces. Check weight limits. |
| Micro-Suction Tape | Delicate surfaces like photos or glass, frequent repositioning. | Reusable/Temp. | Glass, stainless steel, smooth plastic, mirrors. |
| Magnetic Paint | Creating a flexible gallery wall for very lightweight items. | Permanent Paint | Any paintable surface. Requires strong, small magnets. |
- Wall Surface: Are you working with painted drywall, exposed brick, smooth glass, or textured plaster? Every surface has its quirks and plays differently with adhesives and hardware.
- Poster Weight and Size: A standard, lightweight paper poster won't need much support. But a large, laminated, or professionally mounted piece? That’s a different story and requires a much sturdier solution.
- Permanence: Is this for a weekend event, a semester-long display, or something you want up for years? Your answer is the deciding factor between temporary, semi-permanent, or permanent fixtures.
- Aesthetic Goals: Are you going for that clean, floating look with hidden adhesives, or do you want the polished, professional appearance that only a frame can provide?
- Kitchens, where airborne grease can settle on surfaces.
- High-traffic areas that collect more dust and fingerprints.
- Rooms with new paint, as freshly painted walls can have a fine layer of dust. Be sure new paint has fully cured for at least a week before sticking anything to it.
- Drywall: For most framed posters under 10 pounds, a simple picture-hanging hook and nail will do the trick. The angled design of the nail gives it a surprising amount of strength.
- Plaster Walls: These are a bit trickier since they’re harder and more brittle. Ditch the standard nail and opt for a screw-in picture hook. Or, drill a small pilot hole first and pop in a plastic wall anchor to keep the plaster from crumbling.
- Brick or Concrete: This is where you’ll need to put in a little more elbow grease. You’ll have to use a masonry drill bit to create a hole for a wall anchor. That anchor is what will give your screw and hook a secure grip.
- Masonry Nails: These hardened steel nails are your best friend for brick walls. Don't even think about hammering into the brick itself—you'll crack it. Aim for the mortar joints between the bricks. They're much softer and a few gentle taps with a hammer is all it takes to secure a small hook for a framed poster.
- Drilling and Anchors: If you're hanging something with a bit more heft, you'll need to break out the drill. A masonry drill bit will create the pilot hole you need. Pop a plastic wall anchor in, then screw in your picture hook. This method gives you an incredibly solid hold that absolutely will not budge.
- Measure your wall space and create a matching outline on your floor with painter's tape.
- Start with your biggest piece. Don't stick it right in the middle; placing it slightly off-center makes the whole arrangement more dynamic.
- Build out from there. Position your second-largest poster diagonally from the first to create balance.
- Fill in the empty spots with your smaller pieces. Try to keep the spacing consistent, aiming for about 2-3 inches between each poster or frame.
"Ordered how to put a poster on a wall from 4OVER4 and the quality blew me away. Sharp colors, premium feel, arrived 2 days early."
"Been using 4OVER4 for how to put a poster on a wall for a year. Consistent quality every time. The online designer made it easy."
"Switched to 4OVER4 and saved 40% on how to put a poster on a wall. Better quality than my old printer. 60+ paper options."
"4OVER4's how to put a poster on a wall helped us look more professional. Clients notice the difference."
Common Questions About Hanging Posters
What is the best way to hang a poster without damaging the wall?
Removable adhesive strips are the most reliable damage-free option. Clean the wall with rubbing alcohol first, press the strips firmly, and wait at least an hour before letting the poster bear its own weight. For lightweight paper posters, poster putty also works well on smooth painted surfaces.
Can I hang a heavy mounted poster with adhesive strips?
Yes, but you need heavy-duty strips rated for the poster's weight. A 24x36 inch Mounted Poster typically needs 6 to 8 strip pairs. Place them at all four corners and along the top and bottom edges. Always check the weight rating on the strip packaging before committing.
How do I hang a poster on a brick or concrete wall?
Standard adhesive strips don't bond well to rough, porous surfaces. Use adhesive hooks designed for brick, or drill into the mortar joints (not the brick itself) and insert small anchors. Magnetic poster rails hung from a single masonry hook also work well for this.
Will poster putty leave marks on my wall?
On most standard latex-painted walls, poster putty removes cleanly. However, it can leave oily spots on flat or matte paint finishes. Test a small piece in a hidden area first. If it leaves a mark, switch to removable adhesive strips instead.
How do I keep my poster from curling at the edges?
Curling happens when only the corners are secured. Add adhesive putty or strips at the midpoints of each edge, not just the corners. For persistent curling, gently roll the poster in the opposite direction and hold it for a minute before hanging. Mounted Posters from 4OVER4 don't curl at all because the rigid backing keeps them flat.
What's the right height to hang a poster?
The standard gallery height places the poster's center at 57 inches from the floor. This puts it at comfortable eye level for most people. In hallways or spaces where people are standing, this works perfectly. Above a desk or couch, hang it 6 to 8 inches above the furniture instead.